Taylor-Dunn Tire Maintenance
Tires should be checked for air pressure and tread depth at the period specified in your Vehicle Operator and Service Manual. This article will explain the importance of maintaining your tires and how to rotate and change tires on your Taylor-Dunn commercial vehicle.
Tire Pressure
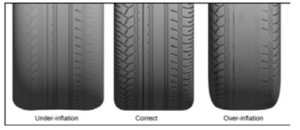
Maintaining the correct tire pressure is important to the safe operation of the vehicle as well as ensuring long tread life. Be sure to check tire pressure when the tire is cold. When checking tire pressure be sure to check all tires including your spare tire. The correct tire size and pressure can be found in the specifications list in the manual. Note: The front and rear tires may have a different tire pressure specification.
Refer to the Specifications section of your Vehicle Operator and Service Manual to find the correct specification for your vehicle.
Underinflated tires may result in:
- Excessive tire sidewall flexing that can result in sudden tire failure.
- Excessive tread wear resulting in shortened tire life.
Overinflated tires may result in:
- Tire explosion due to excessive pressure.
- Reduced road surface traction.
- Increased vibration from the road surface.
- Excessive tread wear resulting in shortened tire life.
Unequal tire inflation may result in:
- Uneven braking and loss of control of the vehicle.
- Steering pulling to the left or right.
Tread Tire Wear
Warning: DO NOT operate a vehicle if the cord is visible on any tire. A tire in this condition may suddenly fail at any time resulting in loss of control of the vehicle.
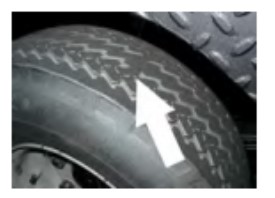
Periodically inspect the tread, shown above, on each tire for wear. Driving with inadequate tread increases the risk of losing control of the vehicle due to hydroplaning on a wet road surface. It also increases the risk of a flat tire due to road debris. Extreme tire wear can result in sudden tire failure and loss of control of the vehicle. Refer to the Maintenance Schedule in your Vehicle Operator and Service Manual for the recommended tire inspection interval.
Minimum recommended tread depth is 1/16 inch (1.5 mm). There are a series of tread depth wear indicators around the circumference of the tire. They will appear as 1/2 inch (13 mm) bands across the tread as the tire approaches its wear limit. The tire should be replaced if any tread depth indicator can be seen or any part of the tread depth is 1/16 inch or less.
Changing a Tire/Wheel Assembly
Warning: If you have a flat tire while driving your vehicle, it is highly recommended that you slowly and carefully exit any main road or highway before attempting to change the tire. Attempting to change a tire on a main road or highway exposes you to extreme danger.
To change a tire, follow these steps:
1. Park the vehicle on a hard, level surface off any main road or highway.
2. Make sure the Start switch is in the OFF position, then remove the key.
3. Place the Direction Control switch in the center OFF position.
4. Set the park brake.
5. Block the wheels on the opposite side of the tire to be changed.
Warning: When lifting the vehicle, always use a hoist with lifting strap, or a jack of adequate capacity. Use jack stands to support the vehicle before starting any repairs. Failure to use lifting and support devices of rated load capacity may result in severe bodily injury. Note that a spare tire, jack, or lug wrench is not attached to the vehicle.
6. Loosen the wheel nuts, but do not remove, before raising the tire off the ground.
7. Raise the tire to be changed off the ground and support with a jack stand.
8. Remove the wheel nuts and tire/wheel assembly.
9. Install the replacement tire/wheel assembly.
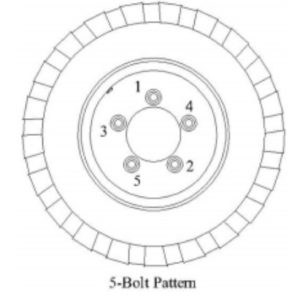
10. Install the wheel nuts and cross tighten per illustration below to 85-foot pounds (115 Nm).
11. Check the tire for proper inflation.
12. Lower the vehicle to the ground and remove the blocks from the wheels.
13. Wheel nuts should be checked for tightness after first 100 miles (10 hours of operation).
Tire Rotation
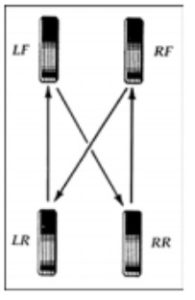
Front and rear tires as well as left and right tires can wear at different rates. It is important to periodically rotate your tires to extend your tire life. Refer to the maintenance schedule in your Vehicle Operator and Service Manual for the recommended interval.
Use the following pattern for a 4-wheel vehicle with no spare tire:
- Right Rear to Right Front
- Right Front to Left Rear
- Left Rear to Left Front
- Left Front to Right Rear
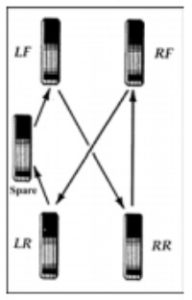
Use the following pattern for a 4-wheel vehicle with spare tire:
- Right Rear to Right Front
- Right Front to Left Rear
- Left Rear to Spare
- Spare to Left Front
- Left Front to Right Rear
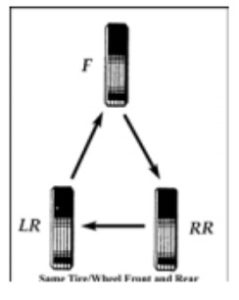
Use the following pattern for a vehicle with the same type wheel front and rear:
- Front to Right Rear
- Right Rear to Left Rear
- Left Rear to Front
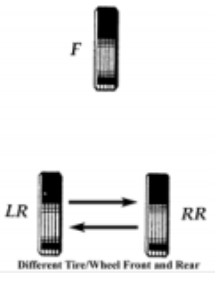
Use the following pattern for a vehicle with a different front wheel:
- Right Rear to Left Rear
- Left Rear to Right Rear
Replacing a Tire
Tire replacement should only be performed by an authorized technician trained in tire replacement. Improper tools or procedures can result in explosion of the tire/wheel assembly, causing severe bodily injury or death. Contact your authorized Taylor-Dunn Dealer for tire replacement.
Never mix tire types, sizes, speed ratings, or load capacity. Only use the tire types and sizes approved for use on your specific model. Contact your authorized Taylor-Dunn Dealer to confirm approved tire types and sizes.
Installing a tire that is not approved may cause:
- Handling problems with the vehicle.
- Sudden tire failure due to mechanical interference.
- Accelerated tire wear and premature failure.
Any of the above may cause loss of control of the vehicle, resulting in a collision or accident with severe bodily injury.
For more information, refer to your Vehicle Operator and Service Manual. For service assistance, contact your authorized Taylor-Dunn Dealer.
